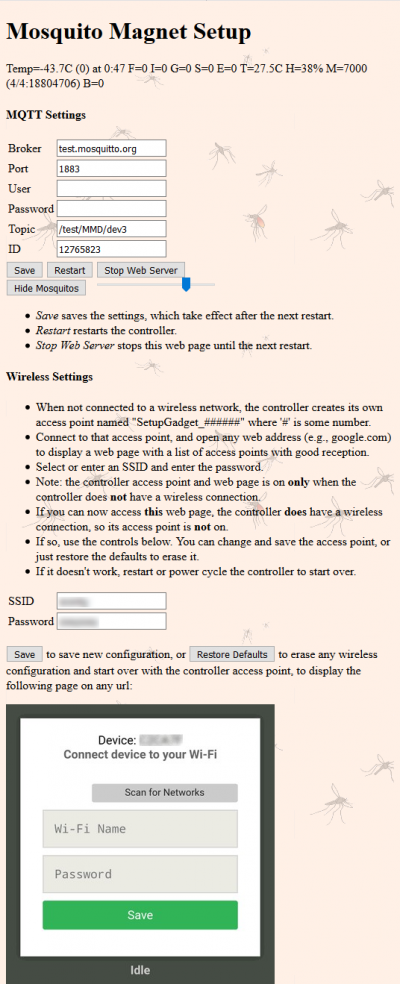
MM Defender NodeMCU Configuration Page
Contents
MM Defender NodeMCU Configuration
This is the revision 2 web page. Actually, the web page is being continuously tweaked. An inordinate amount of time was spent copying and modifying the supposedly royalty-free mosquito artwork and adding two extraneous controls to hide and fade the mosquitos. We are not ace web designers here.
The page should be split up into 3 separate pages: a status and command page, an MQTT broker setup page, and a WiFi instructions and reconfiguration page.
Status
The status line displays the most recent message sent to the MQTT broker.
MQTT Settings
The software implements an MQTT client that publishes its status 'topic' to an MQTT broker for viewing on a PC or phone app. It also receives commands.
MQTT is a very light-weight and fast messaging system suited to Internet-of-Things devices that have only very tiny resources (computing power and memory). The IOT device publishes (sends) a message on a certain topic to a server (called a broker). Another device (e.g., a PC or phone) connects to the broker and subscribes to that topic. The broker delivers the received message to whoever has subscribed to the topic, and holds the latest message for a while so that other clients that later subscribe to the topic can get it.
There are free and paid broker servers. You can set up your own broker service using free software. Some brokers require a user name and password. Internal brokers, and / or user names and passwords make the service more private and secure. This is more important for a connected front door lock.
The settings are:
- Login
- Broker is the address of the broker server you wish to use.
- Port is the port on that server that provides the service you want, typically 1883.
- User is the user name for brokers that require a login
- Password is the corresponding password.
- Topic and Client ID
- Topic is the topic to which the system publishes. It is organized similarly to file folders and names.
- The system subscribes to the topic that starts with the topic with the letter 'Q' appended and listens for commands.
- Client ID is a unique string of characters that identify this particular unit. It can be numeric, or anything you want, as long as it is unique to the broker.
- Topic is the topic to which the system publishes. It is organized similarly to file folders and names.
- Command Buttons
- Save saves the MQTT settings and restarts the MQTT session. Both the publish and subscribe topics are reconfigured.
- Restart reboots the system. This will restart the trap, as well. The trap can take several minutes to cool down before it restarts.
- Stop Web Server will stop the server that supplies this page until the next reboot. Use this to prevent tampering with the system.
- Display Controls
- These are there just to see how much work can be off-loaded to javascript. If javascript is disables, they do nothing.
- Hide/Show Mosquitoes alternately toggles between mosquito background and a simple soothing pattern.
- Fader (unlabeled) fades the background image in and out. It's fun!
Wireless Settings
Actually, these are reconfiguration settings. If the wireless is not connected to an access point, the system creates its own access point, and this web page is not available. Instead, the simple page shown is displayed.
The topic is mostly instructions. The instructions are supposed to be simple. However, nothing is simple when it comes to connecting to WiFi. The key points are:
- If connected to WiFi, this web page re-configures WiFi (to another access point in range).
- If not, it creates its own access point for WiFi configuration.
It may help to reproduce the instructions here:
- When not connected to a wireless network, the controller creates its own access point named "SetupGadget_######" where '#' is some number.
- Connect to that access point, and open any web address (e.g., google.com) to display a web page with a list of access points with good reception.
- Select or enter an SSID and enter the password.
- Note: the controller access point and web page is on only when the controller does not have a wireless connection.
- If you can now access this web page, the controller does have a wireless connection, so its access point is not on.
- If so, use the controls below. You can change and save the access point, or just restore the defaults to erase it.
- If it doesn't work, restart or power cycle the controller to start over.
The Controls Below
- Specify Access Point
- SSID sets the wireless access point's SSID.
- Password sets the required password.
- Buttons
- Save saves the new configuration and restarts the WiFi
- Restore Defaults erases any wireless configuration and starts over with the controller access point.
If you can figure out a better way to write this, please let us know!
